Frequently Asked Question
How to run the OPC UA example?
Last Updated 6 years ago
As you know, Typhoon HIL provides an OPC UA Server component. In order to run our “opc ua server” example, you need to install an external client. In this article, we explain how to run this example with the UaExpert client software.
UaExpert is a C++-based OPC Unified Architecture Client designed for maximum performance and portability. The plug-in framework allows to extend the client to fulfil any particular purpose. You can download the UaExpert client software here: https://www.unified-automation.com/downloads/opc-ua-clients.html
To download this software, you will need to register with the Unified Automation site
The following steps cover how to use and run the OPC UA Server component, and how to run the UaExpert client software.
1. Open the “opc ua server.tse” model at this location (where 202X.X should match your installed Typhoon HIL release version): typhoon\202X.X\examples\models\communication protocols\opc ua\opc ua server
2. Set your PC to a static IP address and connect it with the HIL device using an Ethernet cable
3. Set the same the Subnet mask as in the Model initialization
4. Use bottom Ethernet port (labelled 1) in the HIL
5. Make sure that the IP address in the Model initialization is free to use
6. Compile and load the model. Open HIL SCADA from the same directory
7. Start the simulation and set the voltage source to 10 V
8. Please check the connection using the ping command in the terminal.
NOTE: If you have issues with the connection, we recommend checking that your static IP, connection port, subnet mask, and device connection information are all correct. You can also refer to our documentation on this topic here:
Setting up an Ethernet connection
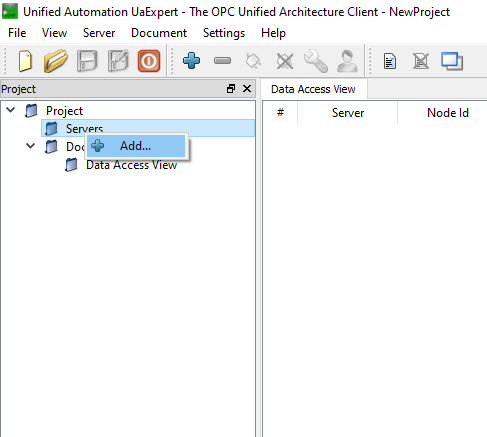
9. Open UaExpert and add a new server. To do that go to Projects -> Servers -> Add…

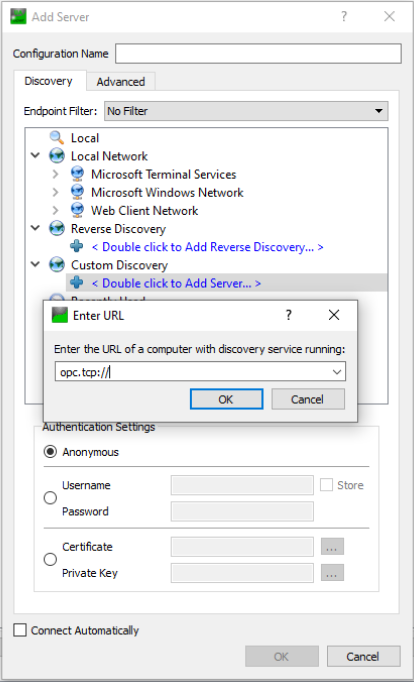
10. Go to the Custom Discovery and select the Add Server option. Enter the IP address from the server configuration list. This is saved as “ip_addr” in the “config1” list inside the Model Initialization panel. Also, it is important to include the connection port. An example of a possible URL is: opc.tcp://192.168.0.78:16664

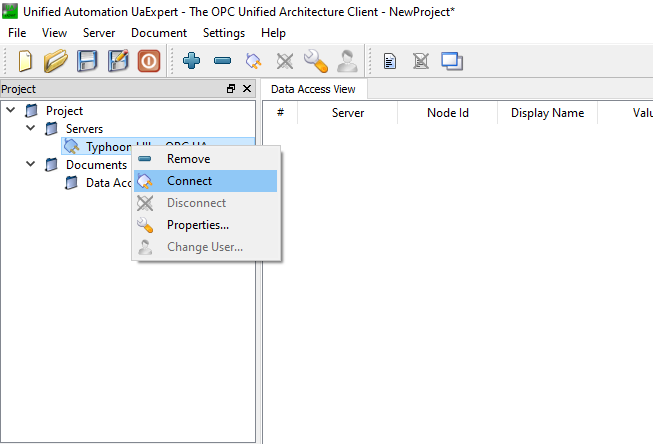
11. Now you can connect to the Typhoon HIL - OPC UA server by right-clicking on the server and selecting Connect

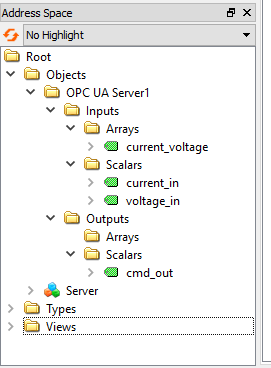
12. After connecting to the server, you can find all inputs and outputs from the model in the Address Space menu bar

13. You can easily drag and drop all input and output variables from the Address Space to the Data Access View, where you can read and write data. To write new values,simply change the number in the “Value” column. By changing the value of “cmd_out” you can open and close the “S2” switch in Schematic Editor

UaExpert is a C++-based OPC Unified Architecture Client designed for maximum performance and portability. The plug-in framework allows to extend the client to fulfil any particular purpose. You can download the UaExpert client software here: https://www.unified-automation.com/downloads/opc-ua-clients.html
To download this software, you will need to register with the Unified Automation site
The following steps cover how to use and run the OPC UA Server component, and how to run the UaExpert client software.
1. Open the “opc ua server.tse” model at this location (where 202X.X should match your installed Typhoon HIL release version): typhoon\202X.X\examples\models\communication protocols\opc ua\opc ua server
2. Set your PC to a static IP address and connect it with the HIL device using an Ethernet cable
3. Set the same the Subnet mask as in the Model initialization
4. Use bottom Ethernet port (labelled 1) in the HIL
5. Make sure that the IP address in the Model initialization is free to use
6. Compile and load the model. Open HIL SCADA from the same directory
7. Start the simulation and set the voltage source to 10 V
8. Please check the connection using the ping command in the terminal.
NOTE: If you have issues with the connection, we recommend checking that your static IP, connection port, subnet mask, and device connection information are all correct. You can also refer to our documentation on this topic here:
Setting up an Ethernet connection
9. Open UaExpert and add a new server. To do that go to Projects -> Servers -> Add…
10. Go to the Custom Discovery and select the Add Server option. Enter the IP address from the server configuration list. This is saved as “ip_addr” in the “config1” list inside the Model Initialization panel. Also, it is important to include the connection port. An example of a possible URL is: opc.tcp://192.168.0.78:16664
11. Now you can connect to the Typhoon HIL - OPC UA server by right-clicking on the server and selecting Connect
12. After connecting to the server, you can find all inputs and outputs from the model in the Address Space menu bar
13. You can easily drag and drop all input and output variables from the Address Space to the Data Access View, where you can read and write data. To write new values,simply change the number in the “Value” column. By changing the value of “cmd_out” you can open and close the “S2” switch in Schematic Editor
